FlutterでGeolocatorプラグインを使用してユーザーの位置を取得する方法
序章
ジオロケーションは、ユーザーがアプリケーションを操作しているときに、ユーザーの現在の物理的な場所を特定するプロセスです。
ジオロケーションに使用できるFlutter用のgeolocatorパッケージとgeocodingパッケージがあります。
この記事では、geolocatorおよびgeocodingパッケージを使用してユーザーの場所を特定するFlutterアプリの例を作成します。
前提条件
このチュートリアルを完了するには、次のものが必要です。
- Flutterをダウンロードしてインストールするには。
- Android StudioまたはVisual StudioCodeをダウンロードしてインストールするには。
- コードエディタ用のプラグインをインストールすることをお勧めします。
AndroidStudio用にインストールされたFlutterおよびDartプラグイン。 VisualStudioCode用にインストールされたFlutter拡張機能。
このチュートリアルは、Flutter v1.22.2、Android SDK v30.0.2、およびAndroidStudiov4.1で検証されました。 このチュートリアルのコードは、geolocator6+およびgeocoding1+をサポートするように更新されています。
ステップ1—プロジェクトの設定
Flutter用に環境を設定したら、次のコマンドを実行して新しいアプリケーションを作成できます。
- flutter create flutter_geolocator_example
新しいプロジェクトディレクトリに移動します。
- cd flutter_geolocator_example
flutter createを使用すると、ボタンがクリックされた回数を表示するデモアプリケーションが作成されます。
コードエディタでpubspec.yamlを開き、次のプラグインを追加します。
dependencies:
  flutter:
    sdk: flutter

  geocoding: ^1.0.5
  geolocator: ^6.1.1
注:AndroidプロジェクトがこれにAndroidXを使用していることを確認する必要があります。 バージョン1.7以降でFlutterアプリケーションを作成した場合、これはデフォルトで提供されます。 そうでない場合は、次のガイドに従ってください: AndroidXMigration。
次に、ios/Runner/Info.plistとandroid/app/src/main/AndroidManifest.xmlを編集して、AndroidとiOSの両方に権限を追加する必要があります。
iOSの権限
コードエディタでInfo.plistを開き、NSLocationWhenInUseUsageDescription、NSLocationAlwaysUsageDescription、およびNSLocationAlwaysAndWhenInUseUsageDescriptionを追加します。
iOSとInfo.plistから始めて、次のキーと値のペアを追加し、好みに合わせてカスタマイズします。
<key>NSLocationWhenInUseUsageDescription</key>
<string>This app needs access to location when open.</string>

<key>NSLocationAlwaysUsageDescription</key>
<string>This app needs access to location when in the background.</string>

<key>NSLocationAlwaysAndWhenInUseUsageDescription</key>
<string>This app needs access to location when open and in the background.</string>
iOS 10より古いiOSアプリケーションをサポートする予定がなく、アプリケーションが使用されていないときにユーザーの場所を取得したくない場合は、NSLocationAlwaysUsageDescriptionとNSLocationAlwaysAndWhenInUseUsageDescriptionの追加を控えることができます。
Androidの権限
コードエディタでAndroidManifest.xmlを開き、次のいずれかを追加します。
ACCESS_FINE_LOCATION:
<uses-permission android:name="android.permission.ACCESS_FINE_LOCATION" />
またはACCESS_COARSE_LOCATION:
<uses-permission android:name="android.permission.ACCESS_COARSE_LOCATION" />
ACCESS_FINE_LOCATIONが最も正確ですが、ACCESS_COARSE_LOCATIONはほぼ街区に等しい結果をもたらします。
このセットアップが完了すると、ユーザーの現在の場所をトリガーして表示するウィジェットを作成できます。
ステップ2—プロジェクトの足場
次に、main.dartファイルを更新し、新しいhome_page.dartファイルを作成する必要があります。
コードエディタでmain.dartを開き、home_page.dartをインポートして、homeをMyHomePageからHomePageに変更します。
import 'package:flutter/material.dart';
import 'home_page.dart';
void main() {
runApp(MyApp());
}
class MyApp extends StatelessWidget {
Widget build(BuildContext context) {
return MaterialApp(
title: 'Flutter Demo',
theme: ThemeData(
primarySwatch: Colors.blue,
visualDensity: VisualDensity.adaptivePlatformDensity,
),
home: HomePage(),
);
}
}
次に、新しいhome_page.dartファイルを作成し、次のコードを追加します。
import 'package:flutter/material.dart';
class HomePage extends StatefulWidget {
_HomePageState createState() => _HomePageState();
}
class _HomePageState extends State<HomePage> {
Widget build(BuildContext context) {
return Scaffold(
appBar: AppBar(
title: Text("Location"),
),
body: Center(
child: Column(
mainAxisAlignment: MainAxisAlignment.center,
children: <Widget>[
FlatButton(
child: Text("Get location"),
onPressed: () {
// Get location here
},
),
],
),
),
);
}
}
これにより、メッセージ"Get location"を含むボタンが作成されます。
ステップ3—緯度と経度を取得する
次のステップは、ジオロケーション機能を追加することです。
これは、Geolocatorのインスタンスを作成し、getCurrentPositionを呼び出すことで実現できます。 これにより、ユーザーがロケーション機能の使用に関心があるかどうかを確認し、関心がある場合は、現在のロケーションをPositionとして取得する必要があります。
home_page.dartに再度アクセスし、_getCurrentLocation()を追加します。
import 'package:flutter/material.dart';
import 'package:geolocator/geolocator.dart';
class HomePage extends StatefulWidget {
_HomePageState createState() => _HomePageState();
}
class _HomePageState extends State<HomePage> {
Position _currentPosition;
Widget build(BuildContext context) {
return Scaffold(
appBar: AppBar(
title: Text("Location"),
),
body: Center(
child: Column(
mainAxisAlignment: MainAxisAlignment.center,
children: <Widget>[
if (_currentPosition != null) Text(
"LAT: ${_currentPosition.latitude}, LNG: ${_currentPosition.longitude}"
),
FlatButton(
child: Text("Get location"),
onPressed: () {
_getCurrentLocation();
},
),
],
),
),
);
}
_getCurrentLocation() {
Geolocator
.getCurrentPosition(desiredAccuracy: LocationAccuracy.best, forceAndroidLocationManager: true)
.then((Position position) {
setState(() {
_currentPosition = position;
});
}).catchError((e) {
print(e);
});
}
}
コードをコンパイルして、エミュレーターで実行します。
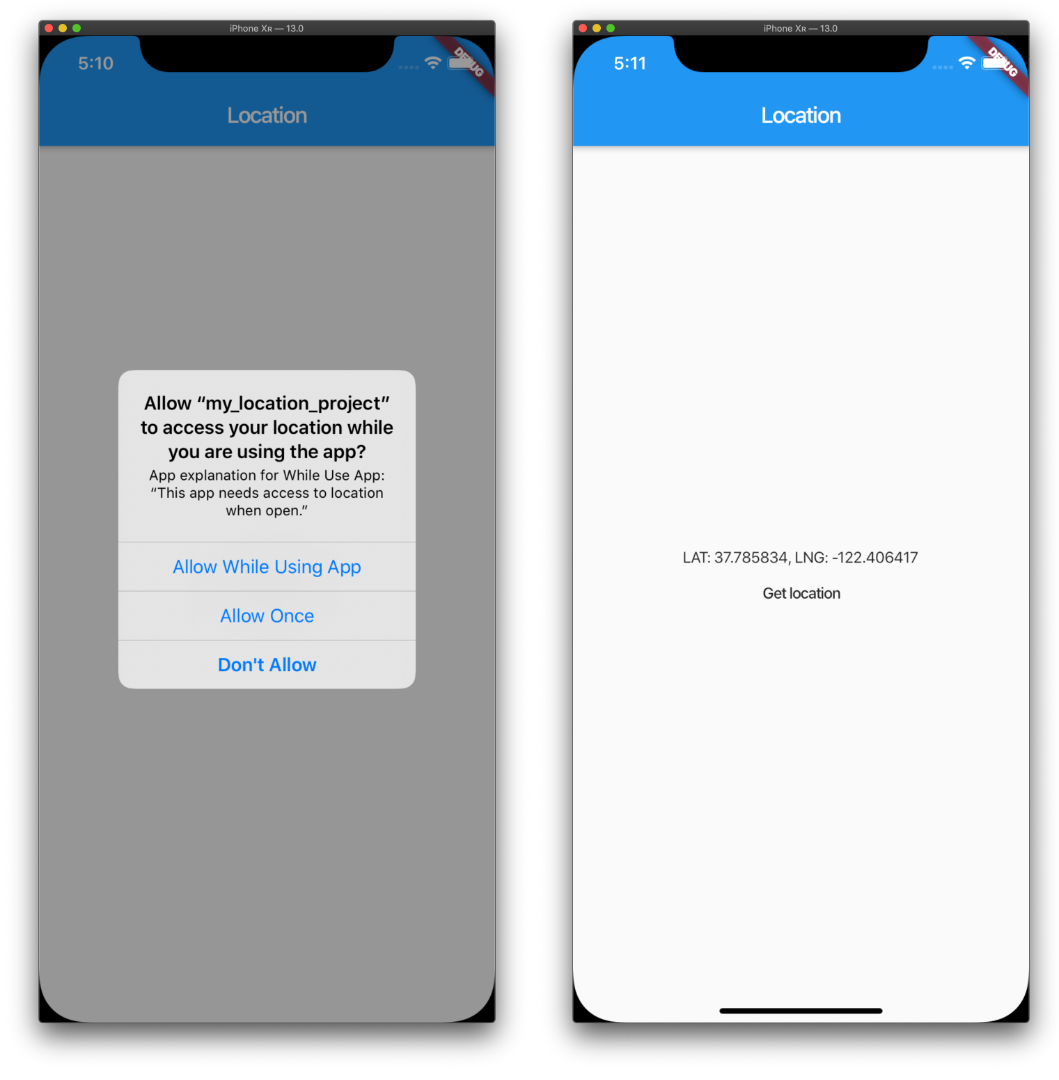
[場所を取得]ボタンを操作すると、最初にアプリへのアクセスを要求するプロンプトが表示される場合があります。 現在地へのアクセスを許可すると、現在地のlatitudeとlongitudeが画面に表示されます。
ステップ4—緯度と経度を人間が読める形式のアドレスに変換する
次のステップは、住所を表示するために座標を変換することです。
latitudeおよびlongitude座標をplacemarkFromCoordinatesに渡すと、Placemarkが返されます。 Placemarkには、locality、postalCode、countryなどの情報が含まれています。
home_page.dartに再度アクセスし、_getAddressFromLatLng_()を追加します。
import 'package:flutter/material.dart';
import 'package:geocoding/geocoding.dart';
import 'package:geolocator/geolocator.dart';
class HomePage extends StatefulWidget {
_HomePageState createState() => _HomePageState();
}
class _HomePageState extends State<HomePage> {
Position _currentPosition;
String _currentAddress;
Widget build(BuildContext context) {
return Scaffold(
appBar: AppBar(
title: Text("Location"),
),
body: Center(
child: Column(
mainAxisAlignment: MainAxisAlignment.center,
children: <Widget>[
if (_currentAddress != null) Text(
_currentAddress
),
FlatButton(
child: Text("Get location"),
onPressed: () {
_getCurrentLocation();
},
),
],
),
),
);
}
_getCurrentLocation() {
Geolocator
.getCurrentPosition(desiredAccuracy: LocationAccuracy.best, forceAndroidLocationManager: true)
.then((Position position) {
setState(() {
_currentPosition = position;
_getAddressFromLatLng();
});
}).catchError((e) {
print(e);
});
}
_getAddressFromLatLng() async {
try {
List<Placemark> placemarks = await placemarkFromCoordinates(
_currentPosition.latitude,
_currentPosition.longitude
);
Placemark place = placemarks[0];
setState(() {
_currentAddress = "${place.locality}, ${place.postalCode}, ${place.country}";
});
} catch (e) {
print(e);
}
}
}
コードをコンパイルして、エミュレーターで実行します。

[場所を取得]ボタンを操作すると、最初にアプリへのアクセスを要求するプロンプトが表示される場合があります。 現在地へのアクセスを許可すると、locality、postalCode、およびcountyが画面に表示されます。
結論
このチュートリアルでは、Flutterアプリケーションでgeolocatorおよびgeocodingパッケージを使用しました。
Flutterについて詳しく知りたい場合は、Flutterトピックページで演習とプログラミングプロジェクトを確認してください。