DigitalOceanドロップレットを使用してHadoopクラスターをスピンアップする方法
序章
このチュートリアルでは、DigitalOceanでのHadoopクラスターのセットアップについて説明します。 Hadoopソフトウェアライブラリは、基本的なプログラミングモデルを活用して、サーバークラスター全体に分散した方法で大規模なデータセットを処理できるようにするApacheフレームワークです。 Hadoopが提供するスケーラビリティにより、単一のサーバーから数千台のマシンにスケールアップできます。 また、アプリケーション層での障害検出を提供するため、高可用性サービスとして障害を検出して処理できます。
このチュートリアルで使用する4つの重要なモジュールがあります。
- Hadoop Common は、他のHadoopモジュールをサポートするために必要な共通のユーティリティとライブラリのコレクションです。
- Hadoop分散ファイルシステム(HDFS)は、 Apache組織で述べられているように、フォールトトレラント性の高い分散ファイルシステムであり、特にコモディティハードウェアで実行して大規模なデータを処理するように設計されています。セット。
- Hadoop YARN は、ジョブのスケジューリングとクラスターリソースの管理に使用されるフレームワークです。
- Hadoop MapReduce は、大規模なデータセットを並列処理するためのYARNベースのシステムです。
このチュートリアルでは、4つのDigitalOceanドロップレットでHadoopクラスターをセットアップして実行します。
前提条件
このチュートリアルには、次のものが必要です。
-
root以外のsudoユーザーが設定された4つのUbuntu16.04ドロップレット。 この設定がない場合は、 Ubuntu 16.04を使用したサーバーの初期設定の手順1〜4に従ってください。 このチュートリアルでは、ローカルマシンのSSHキーを使用していることを前提としています。 Hadoopの言語に従って、これらのドロップレットを次の名前で参照します。
hadoop-masterhadoop-worker-01hadoop-worker-02hadoop-worker-03
-
さらに、サーバーの初期セットアップと、最初のドロップレットのステップ1および2 (下記)の完了後に、DigitalOceanスナップショットを使用することもできます。
これらの前提条件が整ったら、Hadoopクラスターのセットアップを開始する準備が整います。
ステップ1—各液滴のインストールセットアップ
4つのドロップレットの各にJavaとHadoopをインストールします。 各ドロップレットで各ステップを繰り返したくない場合は、ステップ2の最後にあるDigitalOceanスナップショットを使用して、初期インストールと構成を複製できます。
まず、利用可能な最新のソフトウェアパッチでUbuntuを更新します。
- sudo apt-get update && sudo apt-get -y dist-upgrade
次に、Ubuntu用のヘッドレスバージョンのJavaを各ドロップレットにインストールしましょう。 「ヘッドレス」とは、グラフィカルユーザーインターフェイスなしでデバイス上で実行できるソフトウェアを指します。
- sudo apt-get -y install openjdk-8-jdk-headless
各ドロップレットにHadoopをインストールするには、Hadoopがインストールされるディレクトリを作成しましょう。 私たちはそれを呼ぶことができます my-hadoop-install 次に、そのディレクトリに移動します。
- mkdir my-hadoop-install && cd my-hadoop-install
ディレクトリを作成したら、Hadoopリリースリストから最新のバイナリをインストールしましょう。 このチュートリアルの時点で、最新のものは Hadoop 3.0.1.
注:これらのダウンロードはミラーサイトを介して配布されることに注意してください。最初に、GPGまたはSHA-256を使用して改ざんされていないか確認することをお勧めします。
選択したダウンロードに満足したら、 wget 次のような、選択したバイナリリンクを使用したコマンド。
- wget http://mirror.cc.columbia.edu/pub/software/apache/hadoop/common/hadoop-3.0.1/hadoop-3.0.1.tar.gz
ダウンロードが完了したら、を使用してファイルの内容を解凍します。 tar、Ubuntu用のファイルアーカイブツール:
- tar xvzf hadoop-3.0.1.tar.gz
これで、初期構成を開始する準備が整いました。
ステップ2—Hadoop環境構成を更新する
ドロップレットノードごとに、設定する必要があります JAVA_HOME. 次のファイルをnanoまたは選択した別のテキストエディタで開いて、更新できるようにします。
- nano ~/my-hadoop-install/hadoop-3.0.1/etc/hadoop/hadoop-env.sh
次のセクションを更新します。 JAVA_HOME 位置しています:
...
###
# Generic settings for HADOOP
###

# Technically, the only required environment variable is JAVA_HOME.
# All others are optional.  However, the defaults are probably not
# preferred.  Many sites configure these options outside of Hadoop,
# such as in /etc/profile.d

# The java implementation to use. By default, this environment
# variable is REQUIRED on ALL platforms except OS X!
# export JAVA_HOME=

# Location of Hadoop.  By default, Hadoop will attempt to determine
# this location based upon its execution path.
# export HADOOP_HOME=
...
このように見えるために:
...
###
# Generic settings for HADOOP
###

# Technically, the only required environment variable is JAVA_HOME.
# All others are optional.  However, the defaults are probably not
# preferred.  Many sites configure these options outside of Hadoop,
# such as in /etc/profile.d

# The java implementation to use. By default, this environment
# variable is REQUIRED on ALL platforms except OS X!
export JAVA_HOME=/usr/lib/jvm/java-8-openjdk-amd64

# Location of Hadoop.  By default, Hadoop will attempt to determine
# this location based upon its execution path.
# export HADOOP_HOME=
...
また、Hadoopとそのモジュールを実行するために、いくつかの環境変数を追加する必要があります。 これらはファイルの最後に追加して、次のようにする必要があります。 sammy sudoのroot以外のユーザーのユーザー名になります。
注:クラスタードロップレット全体で異なるユーザー名を使用している場合、特定のドロップレットごとに正しいユーザー名を反映するために、このファイルを編集する必要があります。
...
#
# To prevent accidents, shell commands be (superficially) locked
# to only allow certain users to execute certain subcommands.
# It uses the format of (command)_(subcommand)_USER.
#
# For example, to limit who can execute the namenode command,
export HDFS_NAMENODE_USER="sammy"
export HDFS_DATANODE_USER="sammy"
export HDFS_SECONDARYNAMENODE_USER="sammy"
export YARN_RESOURCEMANAGER_USER="sammy"
export YARN_NODEMANAGER_USER="sammy"
この時点で、ファイルを保存して終了できます。 次に、次のコマンドを実行してエクスポートを適用します。
- source ~/my-hadoop-install/hadoop-3.0.1/etc/hadoop/hadoop-env.sh
とともに hadoop-env.sh スクリプトが更新されて供給された場合、Hadoop分散ファイルシステム(HDFS)のデータディレクトリを作成して、関連するすべてのものを保存する必要があります HDFS ファイル。
- sudo mkdir -p /usr/local/hadoop/hdfs/data
それぞれのユーザーでこのファイルの権限を設定します。 ドロップレットごとに異なるユーザー名を使用している場合は、それぞれのsudoユーザーに次の権限を付与するようにしてください。
- sudo chown -R sammy:sammy /usr/local/hadoop/hdfs/data
DigitalOceanスナップショットを使用してこれらのコマンドをドロップレットノード全体に複製する場合は、ここでスナップショットを作成し、このイメージから新しいドロップレットを作成できます。 これに関するガイダンスについては、DigitalOceanスナップショットの概要を読むことができます。
4つすべてのUbuntuドロップレットで上記の手順を完了したら、ノード間でこの構成を完了することができます。
ステップ3—各ノードの完全な初期構成
この時点で、更新する必要があります core_site.xml ドロップレットノードのすべての4のファイル。 個々のドロップレット内で、次のファイルを開きます。
- nano ~/my-hadoop-install/hadoop-3.0.1/etc/hadoop/core-site.xml
次の行が表示されます。
...
<configuration>
</configuration>
次のXMLのようにファイルを変更して、各ドロップレットのそれぞれのIPをプロパティ値の中に含めます。 server-ip 書かれました。 ファイアウォールを使用している場合は、ポート9000を開く必要があります。
...
<configuration>
    <property>
        <name>fs.defaultFS</name>
        <value>hdfs://server-ip:9000</value>
    </property>
</configuration>
サーバーの4つすべてについて、関連するドロップレットIPで上記の書き込みを繰り返します。
これで、サーバーノードごとにすべての一般的なHadoop設定を更新する必要があり、SSHキーを介してノードを接続し続けることができます。
ステップ4—ノードごとにSSHを設定する
Hadoopが正しく機能するためには、マスターノードとワーカーノードの間にパスワードなしのSSHを設定する必要があります( master と worker 参照するHadoopの言語です primary と secondary サーバー)。
このチュートリアルでは、マスターノードは次のようになります。 hadoop-master ワーカーノードはまとめて次のように呼ばれます hadoop-worker、ただし、合計で3つあります( -01, -02、 と -03). まず、マスターノードに公開鍵と秘密鍵のペアを作成する必要があります。マスターノードは、IPアドレスがに属するノードになります。 hadoop-master.
にいる間 hadoop-master ドロップレット、次のコマンドを実行します。 を押します enter キーの場所のデフォルトを使用するには、を押します enter 空のパスフレーズを使用するには2回:
- ssh-keygen
ワーカーノードごとに、マスターノードの公開鍵を取得して各ワーカーノードにコピーする必要があります。 authorized_keys ファイル。
を実行してマスターノードから公開鍵を取得します cat に id_rsa.pub あなたのにあるファイル .ssh フォルダ、コンソールに印刷するには:
- cat ~/.ssh/id_rsa.pub
- ```
-
- Now log into each worker node Droplet, and open the `authorized_keys` file:
-
- ```custom_prefix(sammy@hadoop-worker$)
- [environment fourth]
- nano ~/.ssh/authorized_keys
- ```
-
- You’ll copy the master node’s public key — which is the output you generated from the `cat ~/.ssh/id_rsa.pub` command on the master node — into each Droplet’s respective `~/.ssh/authorized_keys` file. Be sure to save each file before closing.
-
- When you are finished updating the 3 worker nodes, also copy the master node’s public key into its own `authorized_keys` file by issuing the same command:
-
- ```custom_prefix(sammy@hadoop-master$)
- [environment second]
- nano ~/.ssh/authorized_keys
- ```
-
- On `hadoop-master`, you should set up the `ssh` configuration to include each of the hostnames of the related nodes. Open the configuration file for editing, using nano:
-
- ```custom_prefix(sammy@hadoop-master$)
- [environment second]
- nano ~/.ssh/config
- ```
-
- You should modify the file to look like the following, with relevant IPs and usernames added.
-
- ```
- [environment second]
- [label config]
- Host hadoop-master-server-ip
- HostName hadoop-example-node-server-ip
- User sammy
- IdentityFile ~/.ssh/id_rsa
-
- Host hadoop-worker-01-server-ip
- HostName hadoop-worker-01-server-ip
- User sammy
- IdentityFile ~/.ssh/id_rsa
-
- Host hadoop-worker-02-server-ip
- HostName hadoop-worker-02-server-ip
- User sammy
- IdentityFile ~/.ssh/id_rsa
-
- Host hadoop-worker-03-server-ip
- HostName hadoop-worker-03-server-ip
- User sammy
- IdentityFile ~/.ssh/id_rsa
- ```
-
- Save and close the file.
-
- From the `hadoop-master`, SSH into each node:
-
- ```custom_prefix(sammy@hadoop-master$)
- [environment second]
- ssh sammy@hadoop-worker-01-server-ip
- ```
-
- Since it’s your first time logging into each node with the current system set up, it will ask you the following:
-
- ```
- [environment second]
- [secondary_label Output]
- are you sure you want to continue connecting (yes/no)?
- ```
-
- Reply to the prompt with `yes`. This will be the only time it needs to be done, but it is required for each worker node for the initial SSH connection. Finally, log out of each worker node to return to `hadoop-master`:
-
- ```custom_prefix(sammy@hadoop-worker$)
- [environment fourth]
- logout
- ```
-
- Be sure to **repeat these steps** for the remaining two worker nodes.
-
- Now that we have successfully set up passwordless SSH for each worker node, we can now continue to configure the master node.
-
- ## Step 5 — Configure the Master Node
-
- For our Hadoop cluster, we need to configure the HDFS properties on the master node Droplet.
-
- While on the master node, edit the following file:
-
- ```custom_prefix(sammy@hadoop-master$)
- [environment second]
- nano ~/my-hadoop-install/hadoop-3.0.1/etc/hadoop/hdfs-site.xml
- ```
-
- Edit the `configuration` section to look like the XML below:
-
-
- ```xml
- [environment second]
- [label hdfs-site.xml]
- ...
- <configuration>
- <property>
- <name>dfs.replication</name>
- <value>3</value>
- </property>
- <property>
- <name>dfs.namenode.name.dir</name>
- <value>file:///usr/local/hadoop/hdfs/data</value>
- </property>
- </configuration>
- ```
-
- Save and close the file.
-
- We’ll next configure the `MapReduce` properties on the master node. Open `mapred.site.xml` with nano or another text editor:
-
- ```custom_prefix(sammy@hadoop-master$)
- [environment second]
- nano ~/my-hadoop-install/hadoop-3.0.1/etc/hadoop/mapred-site.xml
- ```
-
- Then update the file so that it looks like this, with your current server’s IP address reflected below:
-
- ```xml
- [environment second]
- [label mapred-site.xml]
- ...
- <configuration>
- <property>
- <name>mapreduce.jobtracker.address</name>
- <value>hadoop-master-server-ip:54311</value>
- </property>
- <property>
- <name>mapreduce.framework.name</name>
- <value>yarn</value>
- </property>
- </configuration>
- ```
-
- Save and close the file. If you are using a firewall, be sure to open port 54311.
-
- Next, set up YARN on the master node. Again, we are updating the configuration section of another XML file, so let’s open the file:
-
- ```custom_prefix(sammy@hadoop-master$)
- [environment second]
- nano ~/my-hadoop-install/hadoop-3.0.1/etc/hadoop/yarn-site.xml
- ```
-
- Now update the file, being sure to input your current server’s IP address:
-
-
- ```xml
- [environment second]
- [label yarn-site.xml]
- ...
- <configuration>
- <!-- Site specific YARN configuration properties -->
- <property>
- <name>yarn.nodemanager.aux-services</name>
- <value>mapreduce_shuffle</value>
- </property>
- <property>
- <name>yarn.nodemanager.aux-services.mapreduce.shuffle.class</name>
- <value>org.apache.hadoop.mapred.ShuffleHandler</value>
- </property>
- <property>
- <name>yarn.resourcemanager.hostname</name>
- <value>hadoop-master-server-ip</value>
- </property>
- </configuration>
- ```
-
- Finally, let’s configure Hadoop’s point of reference for what the master and worker nodes should be. First, open the `masters` file:
-
- ```custom_prefix(sammy@hadoop-master$)
- [environment second]
- nano ~/my-hadoop-install/hadoop-3.0.1/etc/hadoop/masters
- ```
-
- Into this file, you’ll add your current server’s IP address:
-
- ```
- [environment second]
- [label masters]
- hadoop-master-server-ip
- ```
-
- Now, open and edit the `workers` file:
-
- ```custom_prefix(sammy@hadoop-master$)
- [environment second]
- nano ~/my-hadoop-install/hadoop-3.0.1/etc/hadoop/workers
- ```
-
- Here, you’ll add the IP addresses of each of your worker nodes, underneath where it says `localhost`.
-
- ```
- [environment second]
- [label workers]
- localhost
- hadoop-worker-01-server-ip
- hadoop-worker-02-server-ip
- hadoop-worker-03-server-ip
- ```
-
- After finishing the configuration of the `MapReduce` and `YARN` properties, we can now finish configuring the worker nodes.
-
- ## Step 6 — Configure the Worker Nodes
-
- We’ll now configure the worker nodes so that they each have the correct reference to the data directory for HDFS.
-
- On **each worker node**, edit this XML file:
-
- ```custom_prefix(sammy@hadoop-worker$)
- [environment fourth]
- nano ~/my-hadoop-install/hadoop-3.0.1/etc/hadoop/hdfs-site.xml
- ```
-
- Replace the configuration section with the following:
-
- ```
- [label hdfs-site.xml]
- [environment fourth]
- <configuration>
- <property>
- <name>dfs.replication</name>
- <value>3</value>
- </property>
- <property>
- <name>dfs.datanode.data.dir</name>
- <value>file:///usr/local/hadoop/hdfs/data</value>
- </property>
- </configuration>
- ```
-
- Save and close the file. Be sure to replicate this step on **all three** of your worker nodes.
-
- At this point, our worker node Droplets are pointing to the data directory for HDFS, which will allow us to run our Hadoop cluster.
-
- ## Step 7 — Run the Hadoop Cluster
-
- We have reached a point where we can start our Hadoop cluster. Before we start it up, we need to format the HDFS on the master node. While on the master node Droplet, change directories to where Hadoop is installed:
-
- ```custom_prefix(sammy@hadoop-master$)
- [environment second]
- cd ~/my-hadoop-install/hadoop-3.0.1/
- ```
-
- Then run the following command to format HDFS:
-
- ```custom_prefix(sammy@hadoop-master$)
- [environment second]
- sudo ./bin/hdfs namenode -format
- ```
-
- A successful formatting of the namenode will result in a lot of output, consisting of mostly `INFO` statements. At the bottom you will see the following, confirming that you’ve successfully formatted the storage directory.
-
- ```
- [environment second]
- [secondary_label Output]
- ...
- 2018-01-28 17:58:08,323 INFO common.Storage: Storage directory /usr/local/hadoop/hdfs/data has been successfully formatted.
- 2018-01-28 17:58:08,346 INFO namenode.FSImageFormatProtobuf: Saving image file /usr/local/hadoop/hdfs/data/current/fsimage.ckpt_0000000000000000000 using no compression
- 2018-01-28 17:58:08,490 INFO namenode.FSImageFormatProtobuf: Image file /usr/local/hadoop/hdfs/data/current/fsimage.ckpt_0000000000000000000 of size 389 bytes saved in 0 seconds.
- 2018-01-28 17:58:08,505 INFO namenode.NNStorageRetentionManager: Going to retain 1 images with txid >= 0
- 2018-01-28 17:58:08,519 INFO namenode.NameNode: SHUTDOWN_MSG:
- /************************************************************
- SHUTDOWN_MSG: Shutting down NameNode at hadoop-example-node/127.0.1.1
- ************************************************************/
- ```
-
- Now, start the Hadoop cluster by running the following scripts (be sure to check scripts before running by using the `less` command):
-
- ```custom_prefix(sammy@hadoop-master$)
- [environment second]
- sudo ./sbin/start-dfs.sh
- ```
-
- You’ll then see output that contains the following:
-
- ```
- [environment second]
- [secondary_label Output]
- Starting namenodes on [hadoop-master-server-ip]
- Starting datanodes
- Starting secondary namenodes [hadoop-master]
- ```
-
- Then run YARN, using the following script:
-
- ```custom_prefix(sammy@hadoop-master$)
- [environment second]
- ./sbin/start-yarn.sh
- ```
-
- The following output will appear:
-
- ```
- [environment second]
- [secondary_label Output]
- Starting resourcemanager
- Starting nodemanagers
- ```
-
- Once you run those commands, you should have daemons running on the master node and one on each of the worker nodes.
-
- We can check the daemons by running the `jps` command to check for Java processes:
-
- ```custom_prefix(sammy@hadoop-master$)
- [environment second]
- jps
- ```
-
- After running the `jps` command, you will see that the `NodeManager`, `SecondaryNameNode`, `Jps`, `NameNode`, `ResourceManager`, and `DataNode` are running. Something similar to the following output will appear:
-
- ```
- [environment second]
- [secondary_label Output]
- 9810 NodeManager
- 9252 SecondaryNameNode
- 10164 Jps
- 8920 NameNode
- 9674 ResourceManager
- 9051 DataNode
- ```
-
- This verifies that we’ve successfully created a cluster and verifies that the Hadoop daemons are running.
-
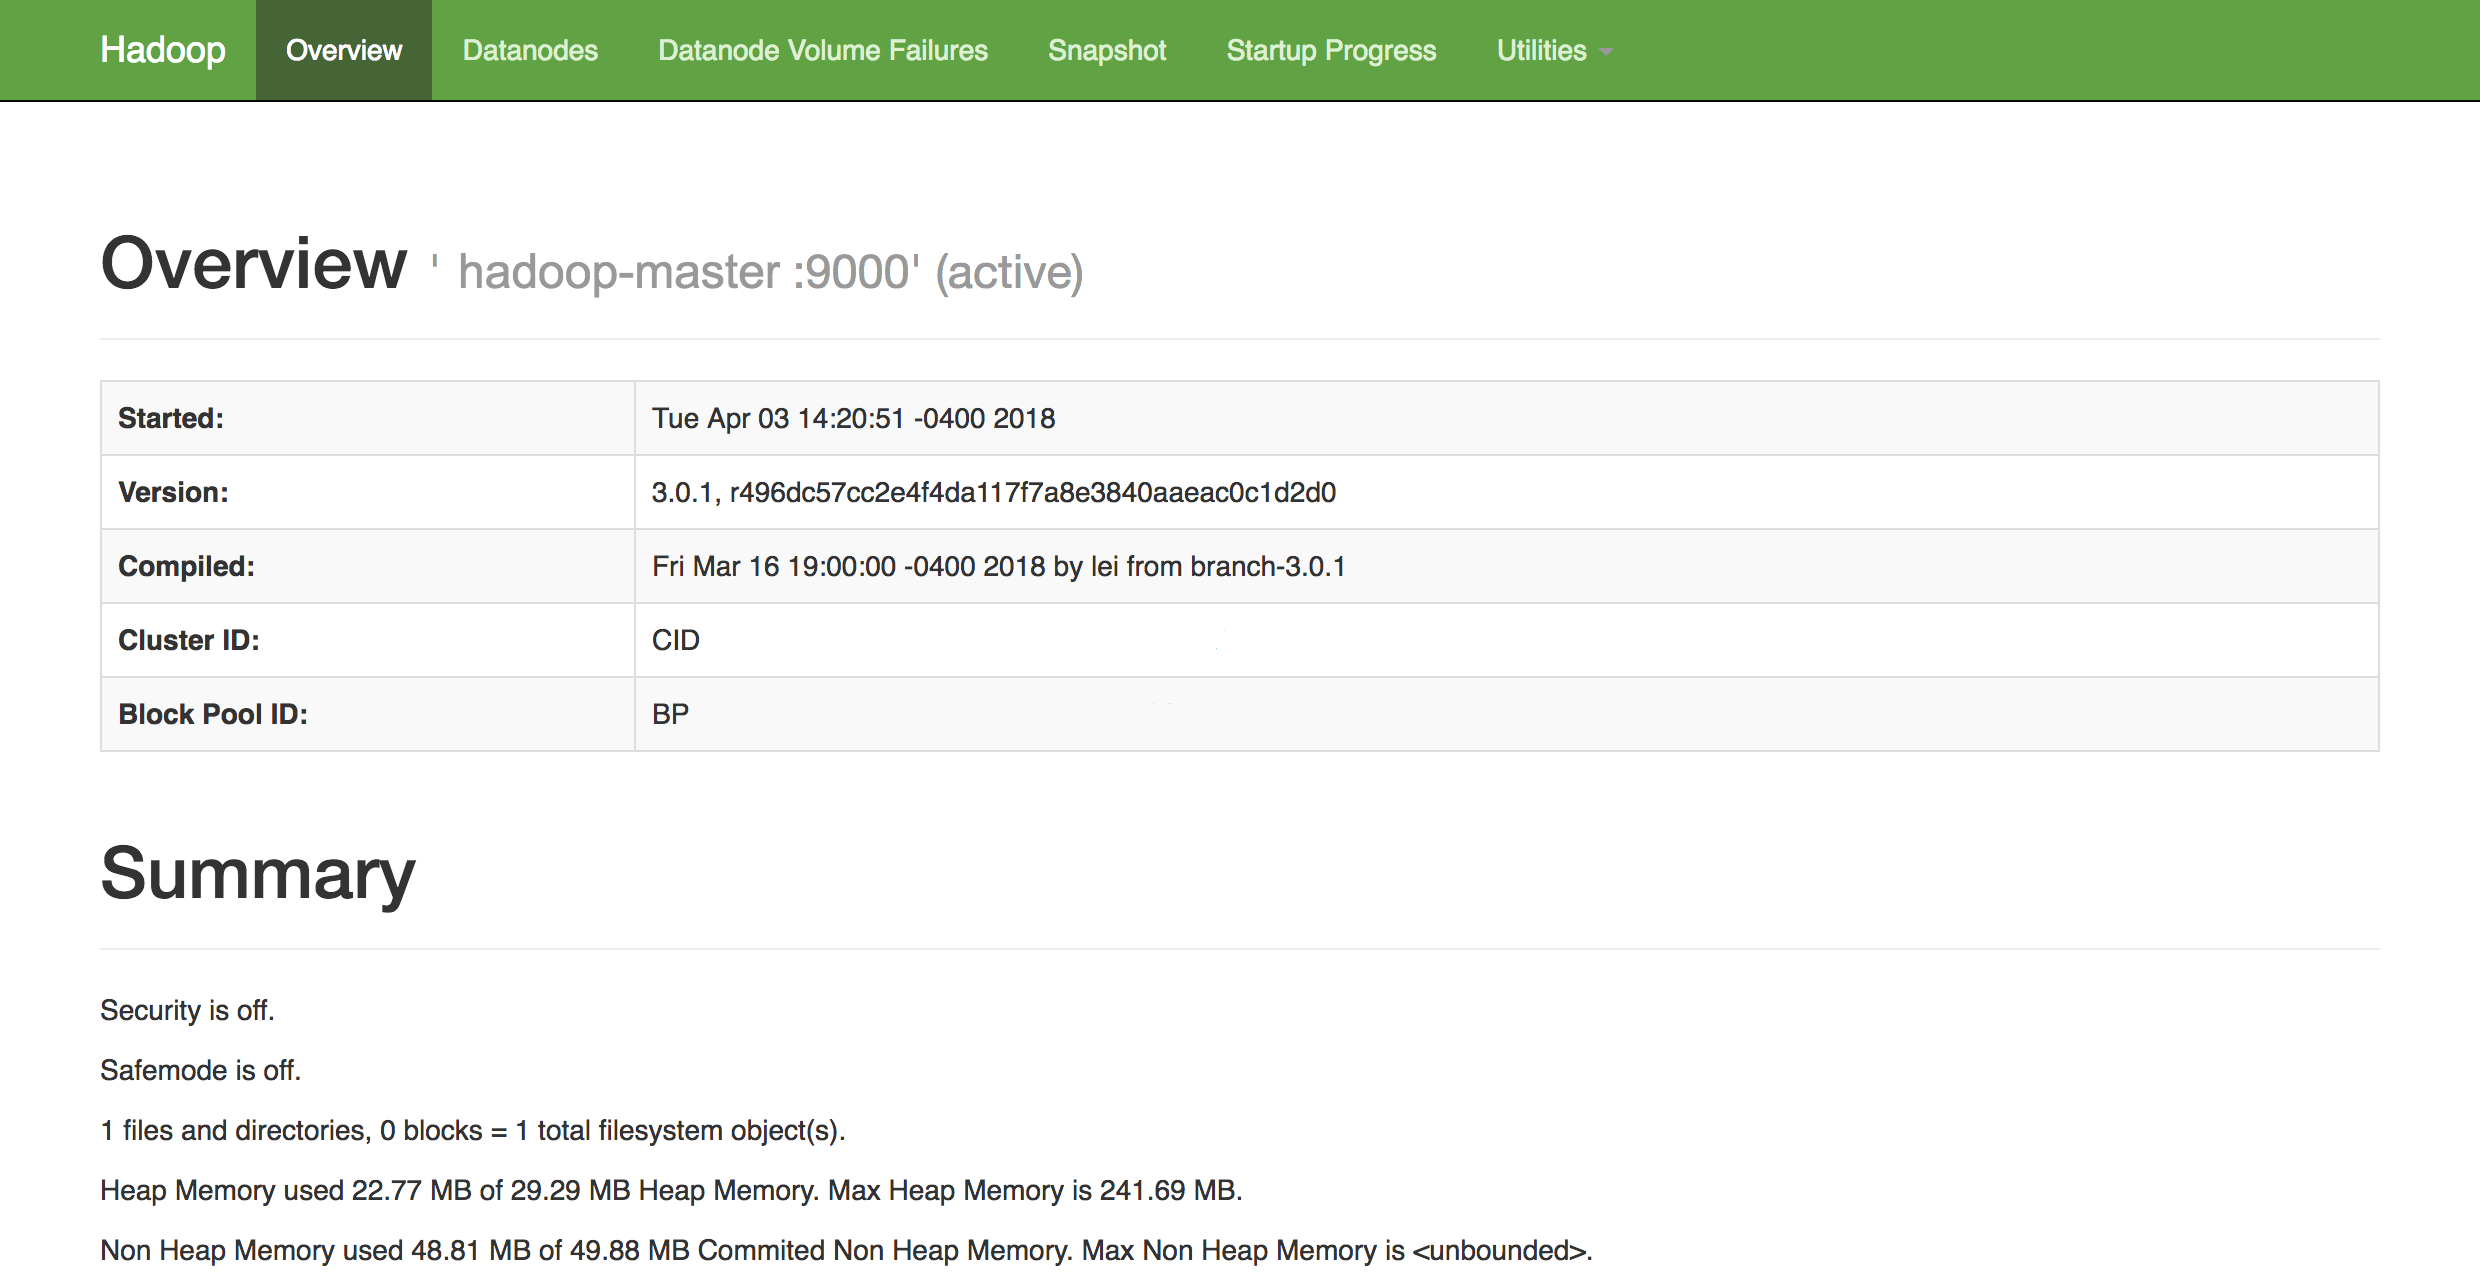
- In a web browser of your choice, you can get an overview of the health of your cluster by navigating to:
-
- ```
- http://hadoop-master-server-ip:9870
- ```
-
- If you have a firewall, be sure to open port 9870. You’ll see something that looks similar to the following:
-
- 
-
- From here, you can navigate to the `Datanodes` item in the menu bar to see the node activity.
-
- ### Conclusion
-
- In this tutorial, we went over how to set up and configure a Hadoop multi-node cluster using DigitalOcean Ubuntu 16.04 Droplets. You can also now monitor and check the health of your cluster using Hadoop’s DFS Health web interface.
-
- To get an idea of possible projects you can work on to utilize your newly configured cluster, check out Apache’s long list of projects [powered by Hadoop](https://wiki.apache.org/hadoop/PoweredBy).